

Camera Operating Instructions: Overview
These instructions specifically apply to the Canon PowerShot SX120 IS, but the general concepts are applicable to any digital camera with manual settings.
Be sure to check out our guide on How to Take Awesome Photos for help setting up your photo area and practicing your technique. But for camera operation and settings, this guide's got you covered.
Aperture Priority
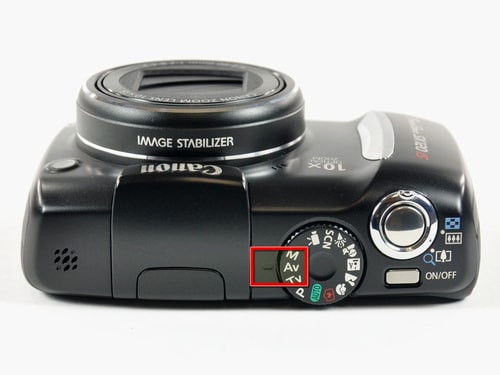
Top of the Canon PowerShot SX120 IS.
The Canon PowerShot SX120 IS has an aperture priority shooting mode, denoted by Av on the mode dial. All photographs should be taken in this mode, as it is the easiest to control. You are able to adjust the aperture setting (more on this later) and exposure compensation (+/- EV) while the camera automatically adjusts the shutter speed.
Camera Buttons

Back of the Canon PowerShot SX120 IS showing camera buttons.
The Canon PowerShot SX120 IS uses a rotary wheel around its main function buttons to change values on-screen. You can also click the rotary wheel (up/down/left/right) to access the ISO/timer/macro/flash functions, respectively. Other cameras may have a similar setup for accessing common functions.
Aperture (f-stop)
Every camera lens has a multi-bladed diaphragm called the aperture that stops down to different diameters to let more or less light into the camera. The aperture setting on a camera is also referred to as the "f-stop" and is denoted by the letter 'f' and a fraction (e.g. f/2.8, f/8.0, f/22). The wider the aperture, the smaller the f-stop number and the less depth of field you will have, which means that the subject will be sharp and in focus, while the background and foreground are left out of focus. Stepping down the aperture to a smaller f-stop will achieve more depth of field, but eventually comes at the price of color distortion and poor image quality.
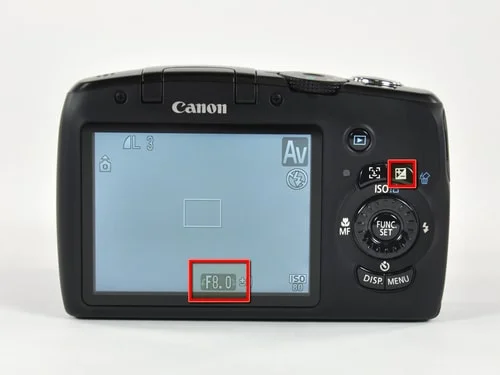
Changing the f-stop.
For the Canon PowerShot SX120 IS, you can change the f-stop as soon as you put the camera in Av (aperture priority) mode. Rotate the dial to change the setting. Set the aperture to f/5.0 to start, and adjust it if you need more depth of field. If the camera has the "adjust EV" mode on screen (covered in the next section), press the +/- button to change back to the "adjust f-stop" mode.
The camera's maximum f-stop value is 8.0, as shown in the picture.

Shallow depth of field (f/2.8)
Great depth of field (f/22)
Exposure Compensation (+/- EV)
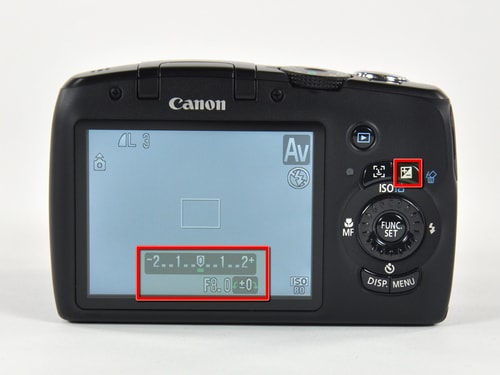
Modifying the exposure compensation.
Exposure compensation is an easy way to adjust the camera's shutter speed while using aperture priority mode to achieve a brighter or darker image. For a given aperture, a negative EV will set a shorter shutter speed and make the picture darker. A positive EV will keep the shutter open a little longer, allowing in more light and making the picture brighter. If you are constantly using extreme EV values, you may want to consider adjusting your lighting setup.
Click the +/- button on the top-right corner on the back of the camera to access the exposure compensation. By default it's set at 0. Setting the number higher will make the photo brighter, and lowering it will make the image darker. You should only change this setting if the pictures you're taking are coming out too dark/light. Do your best to get your images properly exposed while shooting—post-processing in editing software can actually take up more time. If absolutely necessary, Photoshop (or similar software) can also be used in conjunction with exposure compensation to adjust the lighting of a picture.
We use exposure compensation to make the object in the picture look appropriately lit, and then use Photoshop Elements to process the picture and make it even better. Usually, Photoshop's "Auto Levels" is sufficient, but if you have trouble with lighting you may have to do more work to make the picture acceptable. If you get stuck, try using "Adjust Lighting --> Lighten Shadows," and then adjusting "Levels" manually.
Underexposed image

Well-exposed image

Overexposed image
ISO
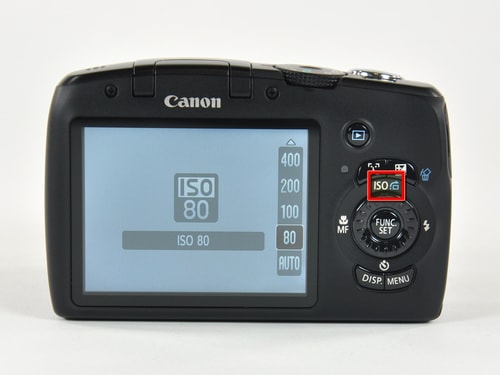
Setting the ISO.
ISO is a measure of a camera's sensitivity to light, and should be kept at the lowest possible value. High ISO values lead to very grainy pictures, and we like to take good-quality pictures. The ISO menu can be accessed by clicking "up" on the rotary button and then using the rotary button to change the value. In the case of the Canon PowerShot SX120 IS, the lowest value is 80, and that's the setting it should be set at. Lower ISO values will require you to use a slower shutter speed, but this is not an issue when using a tripod.
This image is a good example of what a high ISO photo looks like. Notice all of the noise—the colorful speckles—especially in the darker parts of the picture. High ISO is used in very low light conditions where a camera must be hand-held. If this same shot were attempted at a lower ISO, the image would have been less grainy, but there would have been noticeable motion blur due to the slower shutter speed required.

Low ISO (100)

High ISO (800)
Self-Timer
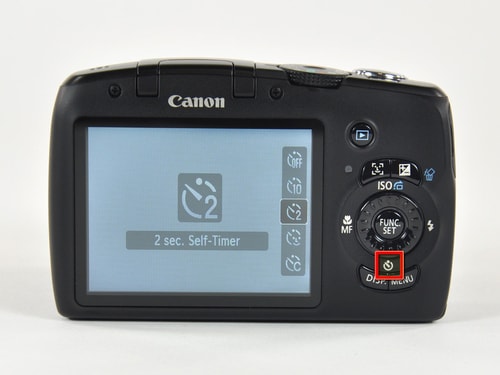
Canon PowerShot SX120 IS' 2-second timer.
Both small ISO values (80) and narrow apertures (f/8.0 or above) slow down the shutter speed. Using a timer compensates for this problem, since even the small act of pressing the shutter button will cause the camera to shake and the image to be slightly blurry. Click "down" on the rotary button and select the 2-second timer. Other cameras may have 2- or 10-second timers; either one can be used.
Macro Mode

Setting the macro mode on the Canon PowerShot SX120 IS.
Macro mode is identified on most cameras by a flower icon. Sometimes it's a setting on the back of the camera (as in the Canon PowerShot SX120 IS), and sometimes it can be part of the rotary wheel on the top of the camera. Use the macro mode when you want to take close-ups of objects. For most of the project work you can use macro mode, since the mode functions well from anywhere between 0.5" to 1.5 feet away from the object. You can certainly determine which mode (macro or normal) works better by taking a couple of test photos. Access the macro setting by clicking "left" on the rotary button.
White Balance
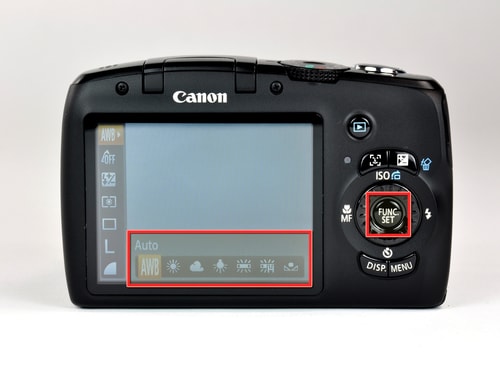
Setting the white balance on the Canon PowerShot SX120 IS.
Setting the white balance mode on your camera can significantly affect the quality of your pictures. All cameras should be set to "AWB" (Automatic White Balance) by default, which means the camera determines the appropriate white balance. However, no camera is perfect in all circumstances.
On the Canon PowerShot SX120 IS, clicking the middle "Func. Set" button will bring up the white balance menu. You can change it to any of the five presets, as well as Custom (only for the truly adventurous). Each preset is made for a certain type of lighting, such as daylight, incandescent bulbs, fluorescent bulbs, and others.
Take test photos in different modes to see how the white balance settings affect the color of the pictures. Be aware that your lighting conditions may change throughout the day (the sun leaves for the day, someone turns on a lamp or opens the door), which may affect the white balance of the pictures.
Alternately you can use photo editing software, such as Photoshop, to adjust the white balance of the photo, but it's a much more time-intensive task than setting up the camera correctly.

Incorrect white balance

Correct white balance
Editing Software
We can't help you learn how to use editing software, but here are some decent online tools. DO NOT add markup (circles, rectangles, arrows, etc.) in these tools. Use our online markup editor for that.
Full Featured
Photoshop Elements (Mac+Win, $80 for students)
GIMP (Mac+Win+Linux, Free)
Lightweight
Google Photos (Mac+Win+Linux, Free)
Apple Photos (Mac, Free)
Photoscape (Win, Free)