

Edit, Edit, Edit!
Put all of your technical writing skills to use by cleaning up your selected guide(s). Click the “edit” button in the upper right-hand corner of the guide to edit it. Remember to be clear and concise, and don’t use any jargon. We want anyone to be able to repair their stuff—so write inclusively so that anyone from your kid brother to your grandmother could follow your guide.
For help on writing, or to brush up on your technical writing skills, check out our Technical Writing Handbook. Don’t worry, this book won’t burn a hole in your wallet—it’s a free PDF download, although you’ll have to fend for yourself with the robots and zombies found inside.
Below, we break down each flag and provide a few examples of the types of improvements you should make.
Grammar Police
Many guides have solid instructions but just need a grammatical boost. Watch for the following:
Missing Articles - Articles are those little words in front of nouns, like the, an, and a. Articles tell your brain that a noun is coming. (We not robot, after all.)
Bad: Disconnect cord from wall.
Good: Disconnect the cord from the wall.
Incomplete Sentences (Sentence Fragments) - Make sure every sentence expresses a complete. (See what we did there?)
Bad: And now four tabs along the upper edge.
Good: Disconnect the four tabs along the upper edge.
Missing or Incorrect Punctuation - Oh, boy. Need we explain how crucial those commas and periods can be?
Bad: Remove the display using rubbing alcohol clean any remaining adhesive from the back side.
Good: Remove the display. Using rubbing alcohol, clean any remaining adhesive from the back side.
Incorrect Spelling or Capitalization - When writing instructions, it’s important to get the details right.
Bad: Use a philips #00 screwdriver to remove the 3.5 mm drive tray screw.
Good: Use a Phillips #00 screwdriver to remove the 3.5 mm drive tray screw.
Confusing Text
Hastily written guides run astray in all kinds of ways. Here are a few to watch out for:
Passive Voice - Writing instructions means giving commands. If in doubt, start off with a verb.
Bad: The three lower tabs can be pried apart to separate the rear case.
Good: Pry apart the three lower tabs to separate the rear case.
Overly Wordy Text - Keep it concise.
Bad: In the event that you completely remove the display away from the chassis without first carefully disconnecting the display cable, you may accidentally damage the display cable.
Good: Before removing the display, be sure to disconnect the display cable, or you may damage it.
Unclear Directions - For clarity, use words for quantities and numbers for measurements.
Bad: Remove the 3 12 mm Phillips #0 screws.
Good: Remove the three 12 mm Phillips #0 screws.
Insufficient Directions - Without being overly wordy, give enough detail to perform the procedure correctly.
Bad: Pull the cable out.
Good: Remove the cable by holding down its release tab and pulling it straight out.
Better Introduction
Some authors are so eager to write instructions, they forget to establish context. For a proper introduction, think about what you’d tell a friend who was about to start this repair. For example:
When or why might this repair be needed?
What problem(s) would this repair likely resolve?
Are any special skills required? (Soldering, etc.)
Is there anything else unusual about this repair?
Take a look at these detailed instructions for writing guide introductions.
MISSING DETAILS
The Details section of each guide includes a time estimate, a difficulty level, and a tools list. Guides with the Missing Details flag are missing information from at least one of these sections. The time estimate and difficulty level are displayed at the top of each guide, and the tools list appears below the What you need heading.

To access the Details section, click the “Edit” tab at the top of the guide, then click the “Details” tab.

Time Estimate: The time estimate is the length of time estimated to complete the repair from start to finish. You'll make an educated guess about the time required to complete the procedure, including all the steps imported from prerequisite guides. (Prerequisite steps only appear in View mode. If you are in the Edit screen, click "View." Learn more about Prerequisites here.) If you don't have the device handy, grab a stopwatch (and a beret) and awaken your inner mime. At a slow and steady pace, pantomime all the actions required to complete the procedure. Don't forget to time yourself! This will give you a good ballpark time estimate. Remember that your audience has little to no technical experience, so it’s best to be a bit generous with your estimate.
Difficulty: The difficulty level gives the reader an idea of how easy or difficult the repair is for someone with little to no technical background. When you click on the drop-down menu in the “Details” tab, a description of each difficulty level will appear. For example, “Easy” requires minimal disassembly and common tools, whereas “Difficult” requires specialty tools or skills such as soldering.
Tools List: This section is a list of tools required to complete the repair. Make sure all of the tools mentioned in the guide text are also listed in the tools section. Most of the tools used in our guides are already in our database, so as soon as you click on “Add a Tool” and start typing, they should appear in the drop-down menu. If you’re unsure what a tool is called, check the Tools and Materials page.
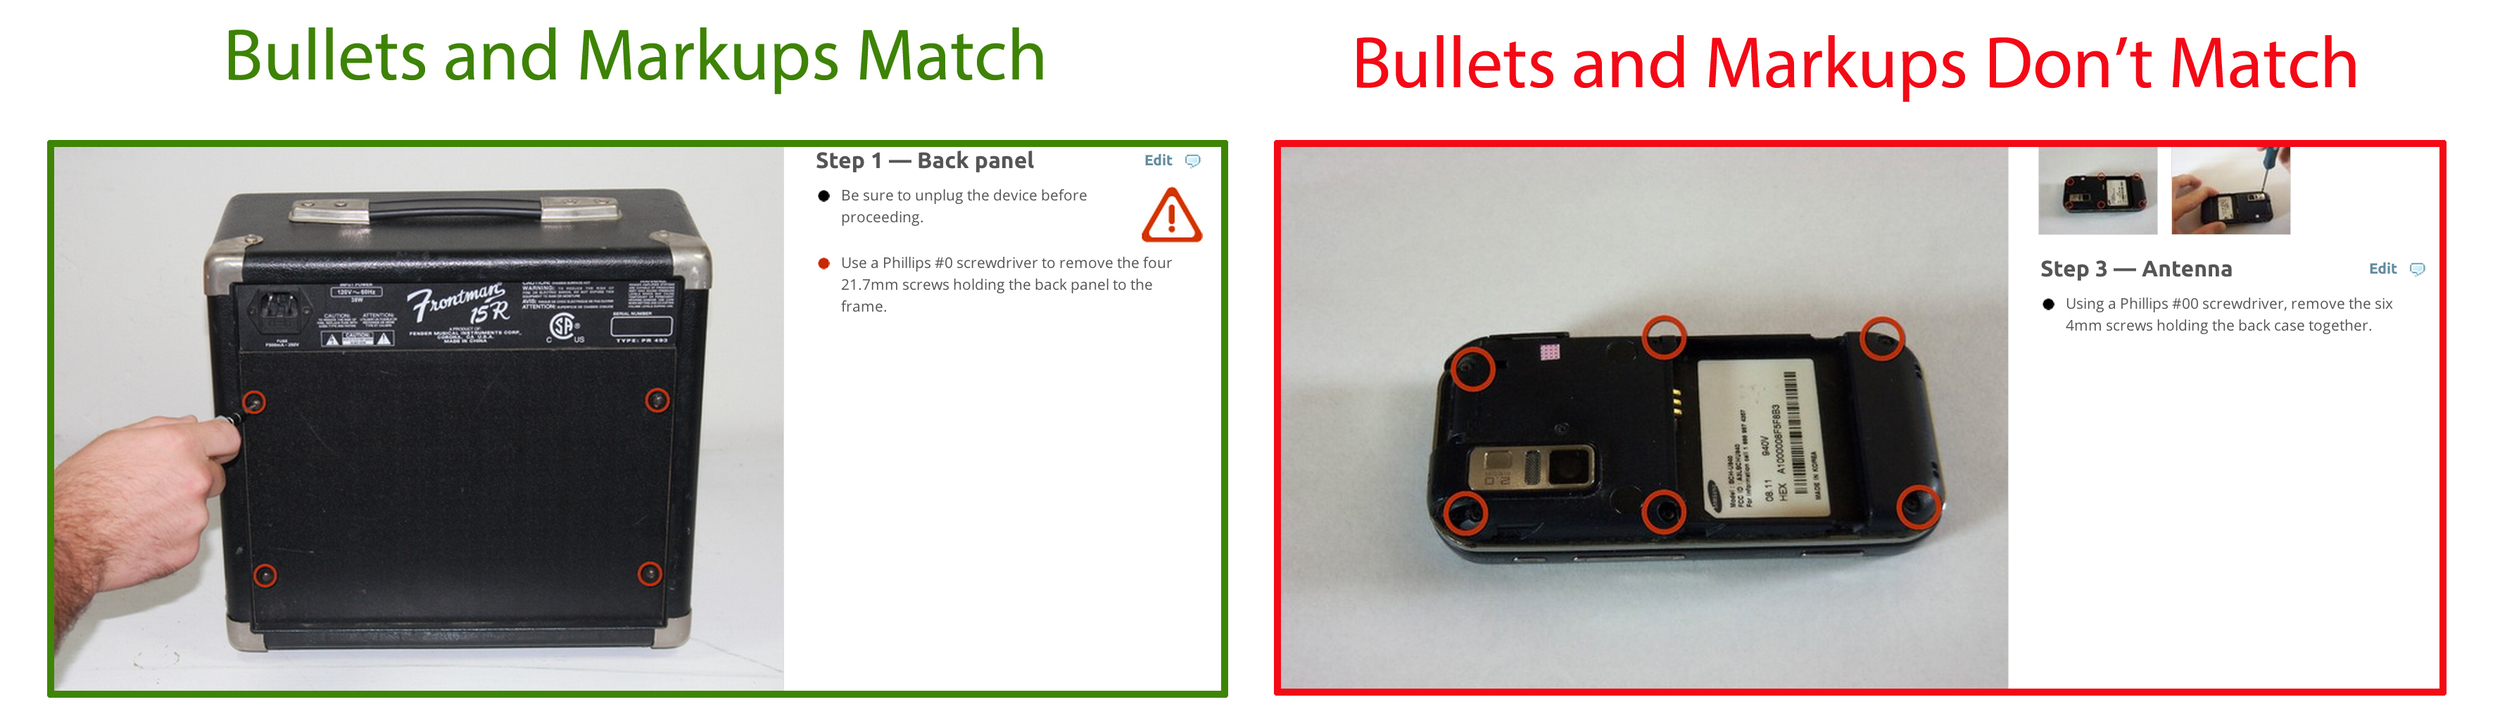
BULLETS!
Use colored bullets that match your markup, so readers know right where to look.
Be sure that special bullets are used appropriately and sparingly. Constant use can overwhelm your readers, making the special bullets ineffective. Don’t write the words “Note” or “Reminder” when using special bullets. The special bullets already alert the reader to pay extra attention. (Exception: As stated below, you can include the words “Caution” or “WARNING” when necessary.)
Note bullets are for information other than instructions, which might be helpful to the reader.
Reminder bullets are for information that is helpful to reassemble the device.
Caution bullets are for warning users of something potentially hazardous to themselves or the device. Use one of the following text descriptions in accompaniment with the “Caution” bullet to explain the nature of the hazard:
Potential for device damage
Caution: Hazardous situation which, if not avoided, could result in minor or moderate injury
WARNING: Hazardous situation which, if not avoided, could result in death or serious injury
Markup Mishap
Use markup colors in ROYGBIV order. For each new step, start over with red.

Use markup sparingly. It's only appropriate when the photo alone can't communicate the necessary information.

A few things that might be useful
Right under the list of parts and tools on a guide (directly above the photo in the first step) is a PDF button. This will allow you to print guides in a neat fashion for "before" and "after" comparisons or for any on-paper editing you might like to do before digitizing.
We're here to help. You can always email us at techwriting[at]ifixit[dot]com at any time! Don't be shy about asking for help.
Let us know when you've finished!
Once you’ve finished your project, send us an email letting us know that you're done, along with a short summary of the changes you made. We’ll look it over to make sure everything is in order. Don’t remove any flags—we’ll take care of that for you. Additionally, if you’d like feedback on your work, just ask!

Well this is awkward!
Nothing slows up an editing party like the ghost of guides past showing up. Make sure you’ve followed all the guidelines closely, so we don’t need to revert and undo your edits. Take a few moments to review the instructions before you email us at techwriting[at]ifixit[dot]com letting us know you’re done editing—that way, everything can be awesome!